Wednesday, December 31, 2008

Using CustomValidator control

Validator controls in asp.net are very much useful ,if we want to validate at the client side.The form will post back if all the validators return positive results.We have 5 types of validation controls available.

  1. RequiredFieldValidator : Ensures that the associated control has been filled with user input.
  2. CompareValidator : If we want to compare values in 2 textboxes,we can use them.
  3. RangeValidator : Checks if the entered value is in the specified range,If so allows postback.
  4. RegularExpressionValidator:Validates the entered data against given regular expression
  5. CustomValidator : This is used when the built-in validators are insufficient to meet our requirement.

Creating CustomValidator

The validation logic is written as a javascript function which accepts 2 arguements.

One is the object and other is the context of validation.

The Name of the javascript function is given in the ClientValidationFunction property of the CustomValidator.

Example

Consider the scenario of getting a no which should be a multiple of 10, the existing validators are insufficient.Here we use our custom validator.

<asp:CustomValidator ID="CustomValidator1" runat="server" 
ClientValidationFunction="Validate" ControlToValidate="TextBox1"
ErrorMessage="No must be multiple of 10"></asp:CustomValidator>


The Javascript function written as


function Validate(object, context) {
if (context.Value%10 == 0) {
context.IsValid = true;
}
else {
context.IsValid = false;
}
}


Wish a very Happy & prosperous new year..

Friday, December 19, 2008

Writing Smart Tags for Windows as well as Web Controls to show help and about.

What are Smart Tags

Smart tags support was introduced in VS 2005.They helps us to do configuration of custom controls very easily in both Windows forms and Web.They also provide access to frequently used properties as well as to most important ones.

How to use smart tags

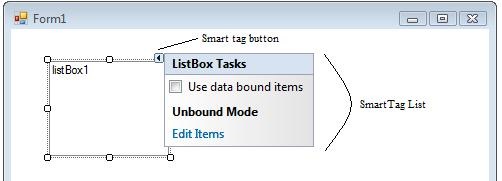
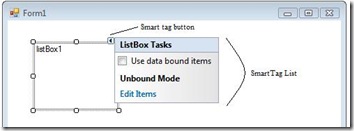
If a control is enabled with smart tags ,it will get the smart tag button at top right when we select the same in Visual Studio editor.A click on that button will show the smart tags.The button visually looks like an arrow towards right.

SmartTagOnWinForms

Creating smart tags for our own custom controls.

Usually smart tags are used to edit control properties or to configure the control itself.Here I am going to show a simple one in both ASP.Net and Windows forms which shows about and help boxes on smart tag click.

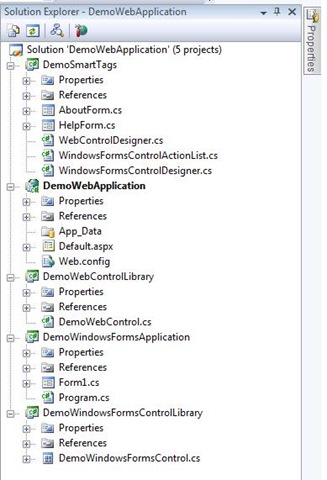
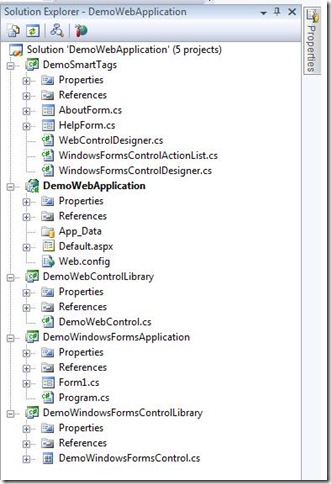
The solution contains 5 projects

  • DemoWebControlLibrary : A asp.net control library project holds the custom web control named "DemoWebControl"
  • DemoWindowsFormsControlLibrary: Contains the custom windows forms control named "DemoWindowsFormsControl"
  • DemoWebApplication & DemoWindowsFormsApplication: Hosts the DemoWebControl and DemoWindowsformsControl respectively
  • DemoSmartTags : Class library contains the smart tag implementation for both Web and Windows forms controls.

prjstruct

There is no need to talk about the controls library project and application projects which hosts them.So lets talk about the DemoSmartTags project.

That project contains 2 windows forms named "AboutForm" and "HelpForm".They are nothing but normal windows forms in which we are displaying the contents.

Another 2 main files / classes are WebControlDesigner and WindowsFormsControlDesigner.They are inherited from System.Web.UI.Design.ControlDesigner and System.Windows.Forms.Design.ControlDesigner respectively and are playing an important role in showing the smart tags.

Both these classes overrides a property called DesignerActionListCollection which is a collection of different actionlists.

public override DesignerActionListCollection ActionLists
       {
           get
           {
               if (actionLists == null)
               {
                   actionLists = new DesignerActionListCollection();
                   actionLists.Add(new ControlActionList(this));
               }
               return actionLists;
           }
       }

Here the ControlActionList is same for both windows forms and web controls.This class defines the actual smart tags and add to the collection.

public class ControlActionList : DesignerActionList
   {
       ComponentDesigner _ComponentDesigner;

        public ControlActionList
           (ComponentDesigner comp)
           : base(comp.Component)
       {
           _ComponentDesigner = comp;
       }
}

Below is the code which creates action items or smart tags and associates to the designer.

public override DesignerActionItemCollection GetSortedActionItems()
       {
           DesignerActionItemCollection col = new DesignerActionItemCollection();
           DesignerActionMethodItem helpItem = new DesignerActionMethodItem(this, "ShowHelp", "Help");

           col.Add(helpItem);
           DesignerActionMethodItem aboutItem = new DesignerActionMethodItem(this, "ShowAbout", "About");

           col.Add(aboutItem);
           return col;
       }

Now it is surprising.Which is the handler that handles the click event? We need to have methods named "ShowHelp" and "ShowAbout".The runtime will automatically call those methods up on click.Not getting why implementation is like this which uses reflection..Strange...

public void ShowHelp() { ShowForm(newHelpForm()); } public void ShowAbout() { ShowForm(newAboutForm()); }

We can't directly show the forms here.We have to use IUIService interface to accomplish the task.

void ShowForm(Form form)
       {
           IUIService service = (IUIService)_ComponentDesigner.Component.Site.GetService(typeof(IUIService));
           if (service != null)
           {
               service.ShowDialog(form);
           }
       }
 

We have completed creating the designer and smart tags.Now we have to associate these designers to the respective web and windows forms controls.

Use the Designer attribute to do the same.

[Designer(typeof(WebControlDesigner))]
   [DefaultProperty("Text")]
   [ToolboxData("<{0}:ServerControl1 runat=server></{0}:ServerControl1>")]
   public class DemoWebControl : WebControl
   {}

[Designer(typeof(WindowsFormsControlDesigner))]
   public partial class DemoWindowsFormsControl : UserControl
   {}

Now compile and open the hosting form or page in designer.Create instance of the control and pops up the smart tags.

Sample can be located here.

Thursday, December 11, 2008

Minimize your code using Lambda Expressions in C# 3.0

In early days ,if we want to show a message box on a button click ,we had to do so many things.
First we have to subscribe to the click event.Then in the event handler we have to write code to show message box.Atleast it will took 3 lines of code.(Most of the code is auto generated by VisualStudio).

btnObj.Click += new EventHandler(btnObj_Click);

void btnObj_Click(object sender, EventArgs e)

{

MessageBox.Show("Clicked :In EventHandler method");

}
With the introduction of anonymous methods in C# 2.0 it became very easy and takes only one line of code.

btnObj.Click += delegate(object sender,EventArgs args){ MessageBox.Show("Clicked :In Anonymous delegate"); };

Later in C# 3.0 the Lambda expressions were introduced which again simplified the coding.

btnObj.Click += (sender, args) => MessageBox.Show("Clicked :In Lambda Expression");


Wednesday, December 10, 2008

Creating HTML Elements through Javascript

This post describes how to create a simple html control or tag using javascript and add to the html page at the runtime.

For that we write a javascript function called CreateButton() which will be called on onload event of body tag.

Initially the html looks simple with only one div tag named 'mydiv' inside body .We are going to add button into this div.

<html>

<head>

<title>Dynamic control creation</title>

</head>

<body onload="createButton()" >

<div id="mydiv">

</div>

</body>

</html>

To create object of button use the following line of code

var btnNew = document.createElement("button");

We can set content by it's innerText property. Now add in to the div using appendChild method.The full script will look like as follows.

<script type="text/javascript">

function createButton() {

var btnNew = document.createElement("button");

btnNew.innerText = "Dynamic Button";

var mydiv = document.getElementById("mydiv");

mydiv.appendChild(btnNew);

}

</script>

We can associate event handlers to this child elements.The below code associates the same event handler(to create new button) to the newly created button.Hence a click on the new button creates one more new button and it continues...

<script type="text/javascript">

function createButton() {

var btnNew = document.createElement("button");

btnNew.innerText = "Create another button";

btnNew.setAttribute("onclick", createButton);

var mydiv = document.getElementById("mydiv");

mydiv.appendChild(btnNew);

}

</script>


Monday, December 8, 2008

Bulk insert into SQL server database table

The need
This comes into role when we need to insert a bulk amount of record into a table.This probably won't be coming from the user but through a text file which has defined field and record terminators.Usually if we have some pre collected data.
Implementation
The bulk insert query in sql helps us to implement this with out a parsing program.
The syntax and details can be found here
Example
We have a table called 'TestTable' in the database 'TestDB' with 2 fields 'ID' and 'Name'.
The data text file contains values which got delimeters as follows
,- separates fields
;\n -separates records
----------------
1,Joy;
2,George;
3,Hai;
4,Hello;
-----------------
Then the query is
--------------------------------
BULK INSERT TestDB.dbo.[TestTable]
FROM 'd:\test.txt'
WITH
(
FIELDTERMINATOR = ','
ROWTERMINATOR = ';\n'
)
---------------------------------

Saturday, December 6, 2008

Assembly language programming links

http://www.asmcommunity.net/

Thursday, December 4, 2008

Can a Program commit suiside?

Yes. A proram can delete itself after running.
You can verify this by running the exe inside this zip file.

Thanks to Alex for the solution.Great thought.
Here is the C# code

Process.Start("cmd.exe", "/C choice /C Y /N /D Y /T .5 & Del " + Application.ExecutablePath);
Application.Exit();//This is needed in the case of Windows application.

Some technical things.
The choice is playing major role here.It delays the deletion by .5 secs .The delay gives enouhg time for the program to get removed from the memory. Else it won't get deleted.
If you need more details about choice open a command prompt then type 'choice /?'

Wednesday, December 3, 2008

Accessing an embedded resource in asp.net dll through web URL

Before going to details of refering embedded resource lets discuss what is embedded resource.Its nothing but a file stored or packed inside a dll.So There will be no physical appearence for that file.Hence nobody can access that file through a url which simply points to the folder structure.

Lets see how to embed a resource and get its coresponding URL.
Steps
  1. Create a web application.
  2. Add a resource into the project.Resource can be a file of any type.
    1. Right click on the project and click on 'Add existing item'
    2. It will show up a file open dialog.Select the file ,it will be added into your project.
  3. Goto properties of that resource and set build action to 'Embedded Resource'.
  4. Add the attribute for namespace as follows to denote this is a webresource
    [assembly: WebResource("<namespace>.<filename>.<extension>","<mimetype>")]
    Eg :[assembly: WebResource("WebResourceURLDemo.joy.jpg","image/jpg")]
  5. Now you can refer the resource with the URL returned from the method Page.ClientScript.GetWebResourceUrl(typeof(class name), "<namespace>.<filename>.<extension>");
    Eg:Page.ClientScript.GetWebResourceUrl(typeof(_Default), "WebResourceURLDemo.hello.jpg");

The URL will be pointing to WebResource.axd with some url parameters.These parameters help the system to identify the correct resource.

A sample can be downlaoded from here which stores an image in asp.net dll and refering through web resource url.